Computer Programming with Scratch

SL-Scratch

Today was the first day of Mr Boo’s new project (for more information about Project Based Homeschooling see this post). He has chosen to create a video game using the program Scratch. He has used it before, but not much, and he wanted my help in creating a proper game. This turned out to be a great project – I didn’t realize what a wide variety of learning would be involved.

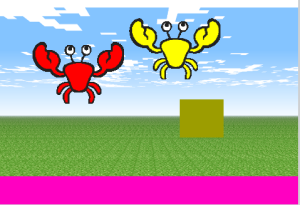
He started by importing a generic background image from Minecraft. He chose a crab to be his first character (or “sprite”, as they are called). Eventually he added another sprite, coloured the “ground”, and added an obstacle (the brown block). Here’s a screen shot showing where he left off today:

Screen Shot 2013-09-27 at 5.41.51 PM

But first, he started with just the red crab and the background (the pink bar was originally white). He attempted to program the sprite to move right or left with the right or left arrow keys, respectively. However, he ran into trouble when he could not get the sprite to change direction – it just rotated about its axis instead.

I suggested we watch a tutorial and Mr. Boo searched YouTube. He chose this one by MrMattperrault that shows how to make a sprite jump more realistically by incorporating gravity and velocity changes into the motion of jumping and falling.

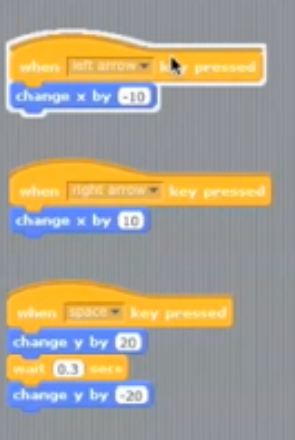
At the beginning of the video the narrator reviews how to make the character move left and right. By looking at the scripts Mr. Boo learned where he had gone wrong: to change direction left or right you need to set x to positive or negative numbers (the magnitude of the number is how many steps the character takes when the key is pressed). He also saw that to get a character to jump (and thus fall back down rather than just moving up higher) he needed to set y to positive and negative numbers (with a slight delay in between).

Screen Shot 2013-09-27 at 5.20.03 PM

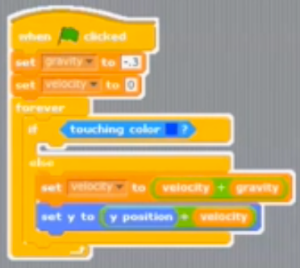
The main topic of the video was how to get a character to jump realistically – in other words, incorporating acceleration due to gravity. Mr Boo immediately wanted to try this, and so he copied the scripts from the video. Not only did he get a lesson in physics about why things bounce, but he was introduced to the concept of velocity and how that relates to gravity for the sake of programming movement. And, he was also introduced to the concept of conditional phrases: “if/then”. Finally, he learned that multiplying anything by -1 changes it’s sign (and thus, in this case, the direction of motion). Here is a script that causes the character to drop onto the ground:

Screen Shot 2013-09-27 at 5.58.11 PM

Basically this says if the character is touching the colour blue (which was the ground in the video demo) then it needs to stop moving, and if it isn’t touching blue (the ground) it needs to fall. Mr Boo programmed his sprite according to these directions and, at first, the character wouldn’t move. With some assistance from me, we figured out the problem. There was a white rectangle along the bottom of the background, and we’d programmed the sprite to stop falling when it touched white. However, there is also white in the sky so that’s why the character wasn’t moving. When Mr Boo changed the ground to pink it worked.

Before wrapping up for today he added a second character and a block to jump over. He’ll program them next Project Time.

Project Based Homeschooling

THUMBNAIL_IMAGE_2

Over the summer I discovered the Camp Creek Blog and Project Based Homeschooling (PBH). After reading the blog for a bit I decided to purchase the eBook by Lori Pickert. Before I’d even finished reading it I knew this was something I really wanted to incorporate into our homeschooling.

By and large, my kids do what self-directed learners are supposed to do: they have interests, they ask questions (in the car, lying in bed at night snuggling, and sometimes when I’m totally distracted by other things), and they start lots of little projects. They have big ideas and lofty goals but they lack the skills to see them to completion. I used to wonder whether they were just “flaky”, and lost interest quickly, but reading this book made me realize that being able to come up with a manageable project, direct it, set goals along the way, monitor progress, evaluate and re-evaluate, etc., are skills that kids can learn, and how better to do so than by directing their own project with the help of a dedicated mentor.

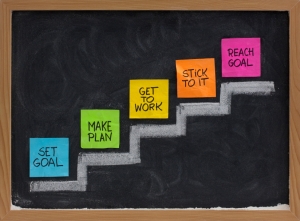
set and reach goal concept

Pickert talks a lot about the value of mentoring. This is not only key to PBH, but it is also something that I have long been drawn to as the best way of educating kids. Or anybody for that matter. In PBH, the adult acts as a mentor, assisting the child and providing access to resources and materials, showing the child that their work is valued and valuable by devoting time and space to their projects, and by scheduling time for the child to return again and again to their work without being distracted by other things. But it is the child who directs the work and makes all the decisions about how to progress. They make mistakes, too, and that is all part of the learning process. The adult’s role is one of assistant, facilitator, a person off whom to bounce ideas, and to keep track of all the steps involved.

I have scheduled an hour each week to do Project Time with each child. I’ve sat down and discussed the concept with them and they are keen on the idea. I’ve got notebooks for each child in which I will jot down their goals, ideas, questions, and requests. I’ll translate these into posts on my homeschooling blog, which will be tagged for easy reference and which will be referred to in my weekly learning reports for our homeschooling program.

I’m very excited to see what project ideas the kids come up with!

The Joys of Hand Quilting

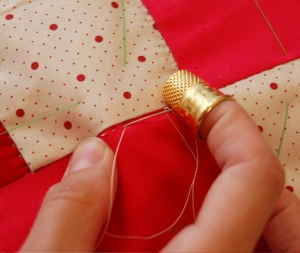
handquilting2stitches

When I first became interested in quilting it was the hand-sewing aspect that turned me off. While I admired the patterns and fabrics used in quilts, the idea of all that hand-sewing made me feel it was something I would never really have the patience for. Luckily, I discovered machine quilting and it gave me the courage to try this wonderful craft.

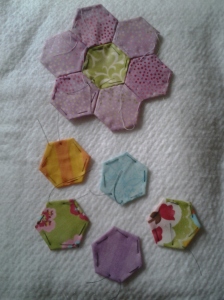
I’m loving the creativity of quilting and all the many techniques that can be used. This is a good thing because I’ve found that with each new project I want to tackle a new skill. I went from a very simple pattern with My First Quilt to an improvisational pattern with my South Pacific quilt. I learned machine-finished applique for the Star of David quilt. My current project, a bed quilt for my daughter, gave me a chance to try English Paper Piecing – I made hexies!

Hexies for Miss Em's quilt.

Hexies for Miss Em’s quilt.

It was while I was making the hexies that I discovered the joy of handwork. I loved that I could sit in front of the TV in the evenings and watch shows or Netflix while I was sewing. While my machine is in the same room as the TV, the noise makes it difficult to hear the show, for me and other family members. So if I was really interested in following the show, I couldn’t use my machine at the same time.

On another occasion, it was raining and I was sitting on the sofa doing some paper piecing. I loved the peacefulness of hand sewing while listening to the rain falling on the roof. There is so much noise in the world and sometimes you just want to do something quiet. Now, I do have my knitting, which I often do in front of the TV, but sometimes it requires a bit more mental focus, like if I’m working a complicated pattern, counting rows, or making cables, for example. Basic hand sewing is fairly mindless, in a zen kind of way and also, if I’m doing this for a while, it helps to have different things to work on so your hands don’t cramp or get injured from repetitive strain – mixing up sewing, quilting, and knitting during a long movie or a few episodes of binge watching is like cross-training for artists!

OLYMPUS DIGITAL CAMERA

Anyways, I became hooked and soon I was hunting around the web for inspiration for other paper piecing projects. Well it didn’t take long for me to realize that hand quilting might be just as much fun. I immediately came up with a small project idea that could incorporate both paper piecing and hand quilting: dresden plate potholders. With Christmas just around the corner (from a crafting perspective) I decided they would be a gift for my Mother-in-law. Just the excuse I needed to buy fabric and supplies!

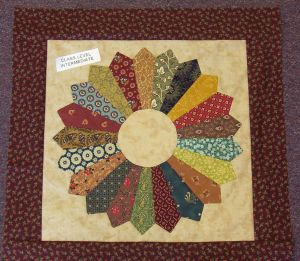
Example of a dresden plate block.

Example of a dresden plate block.

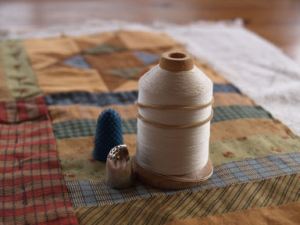
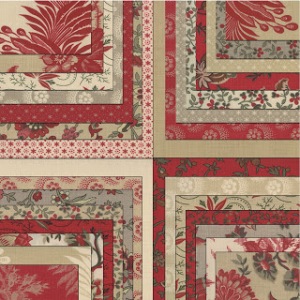
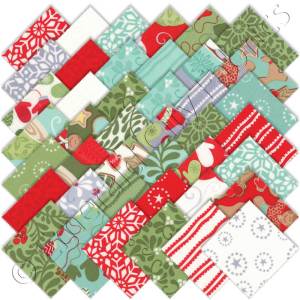
The next chance I got, I headed down to my fave fabric/quilting store and picked up a small, cheap hoop, some quilting needles, a thimble, and hand quilting thread (it’s lightly waxed). I also bought two charm packs from Moda: Esprit de Noel is a lovely, old-fashioned series that I thought my Mother-in-law would like; the more modern In From the Cold series combines beautiful greys with greens and blues – I like it so much I’m going to make myself something from it.

Esprit de Noel, by Moda

Esprit de Noel, by Moda

In From the Cold, by Moda

In From the Cold, by Moda

Back at home, I couldn’t wait to start practising hand quilting. A oncoming cold gave me the excuse I needed to put aside housework and lay down on the sofa with some tea, a good movie, and my hand quilting supplies. I’d watched several YouTube videos and I thought that the Thimble Lady’s technique made the most sense – I was not satisfied that I needed to poke my fingers and sacrifice my skin for the sake of my craft! However, I just couldn’t get the hang of it, perhaps because I lacked the specialized thimble she uses, or just that I had zero experience with hand quilting (or hand sewing for that matter). I was starting to get a bit frustrated so I hunted around for some other videos and came across Sarah Fielke’s video for Craftsy. I found her method to be easier and her tip about not pushing on the needle before you make the “hill” with your thumb was key for me. Soon I was making straight lines with fairly evenly spaced stitches. Not bad for a beginner! I was hooked. But practising on a scrap square was not very satisfying. Time to start a real project!

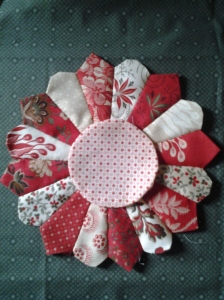
I’m almost done paper piecing the dresden plate for MIL’s pot holders. I just need to applique the dresden and centre circle to the background fabric and I’ll be able to start quilting! I’m super excited and can’t wait to figure out what quilting designs I’m going to use.

2013-09-24 14.05.46

I’ve got lots of ideas for future projects, and since I’ve decided to focus more on small projects and art pieces for the next little while (bed quilts are expensive to make and I get tired of dealing with all that fabric after a while, plus I was recently inspired by a fabric arts showing at a local gallery – more on that in a later post), I’ll have many opportunities to practice hand quilting techniques. Between that, paper piecing, and hand applique I’ll have lots to tinker with as the season brings us back indoors.

my_pincushion_blog

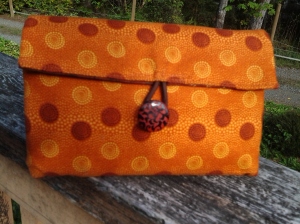
I made a Wallet!

wallet1

(Disclaimer: due to a recent cell phone disaster I’m resorting to an antique phone with a crappy camera: the photos really don’t do these fabrics justice!)

I’ve had my lovely Pfaff Ambition 1.0 sewing machine for about a year now. I’ve made a few quilts here and there, but I really hadn’t planned on doing much non-quilt-related sewing. Sewing was never really my thing, you see (who knew a 45 year old woman could still discover new things about herself?).

Anyways, I’d been thinking for some time about getting a new wallet—my old one is going on 10 years now—but didn’t want to spend money on something so frivolous. I saw some cute wallets in a chain store a couple of months ago and thought “hey, I bet I could sew something like that!”. I consulted the Mighty Google, who led me to the Color Me Domestic blog and a post about a fabric DIY Wallet. Inspired by the beautiful fabric combination she used, I decided to try one for myself. The pattern was mostly based on a tutorial from All Wrapped Up, but I liked what Color Me did with it, and so I based mine on that.

2013-09-19 16.05.54

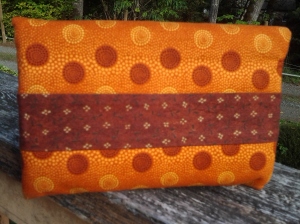
Back of wallet when closed.


I had a great time at my local fabric store looking through their box of fat quarters and trying to find a set of three fabrics that looked great together. I wanted something with a slight oriental feel to it and I was really happy with the fabrics I chose (that stripe across the back is also the inside liner fabric). The total cost was less than $15.

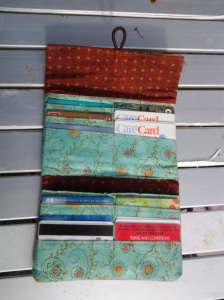
Thanks to Color Me’s suggestions, I increased the size of the flap closure and have had no problems with curling at the edges. I also decided to switch the inside bits around so that the zipper enclosure was at the top and I could access my money without having to fully open the bottom flap. I switched the orientation of the bottom section so that it was upright when fully opened. Finally, I added a liner to both sides of the pockets (there is a pocket behind the zipper and another behind the bottom credit card holder) using the same fabric that lines the inside of the wallet.

2013-09-19 16.00.14

I am so proud of this wallet! It’s definitely not perfect, but it is the first real sewing project I’ve ever done, and it is something practical that I use virtually every day. It is far prettier than anything I could have bought (especially for $15!), and the satisfaction of knowing I made it myself makes up for any imperfections in stitching, or the fact that my zipper occasionally gets stuck because I didn’t sew the inside seams close enough to the edge.

While I enjoy making pretty things, making pretty things that are super useful is just that much more satisfying!

The Calorie Economy

calories_counter_21747_1_1_730

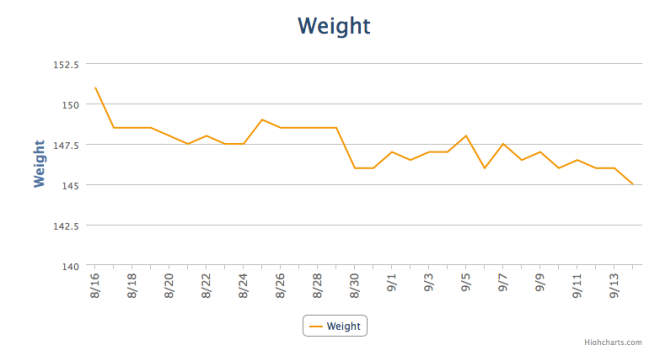
I’m a few days away from 8 weeks since I started my fitness and weight loss plan. I’ve lost 9 lbs as of today and am still really, really happy with the plan. I feel that this is something I will be able to sustain over the long term, and even if I slip up a bit I will have the tools and the know-how to correct that.

It has become interesting to see how my approach to food has changed. Tracking calories seems to naturally result in the development of a “calorie economy”, where choices are made based on your daily budget, much as you might choose how to spend money. You consider 1) whether you can afford it, 2) how long it will take to “pay if off”, and 3) whether the price is worth the reward.

Sticking to a budget and having a goal really helps with the first point. If the calories aren’t available, I don’t eat. Of course, you have to make sure that you are not starving yourself or hungry at the end of the day. With practice I have learned what meals are satisfying and what leaves me hungry soon afterwards. I generally eat a light breakfast and lunch so that I can enjoy a filling dinner and I usually have room for a small treat in the evening. By divvying up my calories this way I don’t “run out of money before the end of the month” and still have room for what I want.

ucm053272

With regard to the second point, it is possible to overindulge one day if you are willing to underindulge the next. For example, on a couple of occasions I’ve gone out and eaten rich meals at restaurants (we had relatives visiting from overseas) and had a high calorie day as a result. But the next day I found that I wasn’t very hungry and it was easy to eat lighter. How long you have to eat lighter will depend, of course, on how much you overindulged. But by tracking calories it is easy to figure this out. Of course, it is not easy to sustain a lighter-than-usual intake so I make sure that my overindulgence can be made up for within a day or two at the most. As with credit cards, you can pay it off in installments if it only takes a month or two, but eventually you will want to buy something else and if you are still paying off the first item it will lead to trouble (note: this is just an analogy; I don’t believe in carrying a balance on my credit cards!).

In terms of the third point, like every savvy shopper you make a decision as to whether the purchased item is worth the price. I was in Starbucks the other day. I just had tea with a bit of milk and sugar, but I grabbed a couple of “nutritional information” pamphlets and perused them while I sipped. I was floored, absolutely floored, by how calorie-laden their food is. And it’s not even  tasty! I find their food dry and stale most of the time, which is why I rarely eat there. I do, however, like their ginger molasses cookies and have, on occasion, indulged in one thinking “how bad can one cookie be?”. I could not believe that it was almost 400 calories for one of those!!! I eat less than that at breakfast or lunch! Imagine trading an entire meal for one cookie, and not even being the best cookie you’ve ever tasted! Definitely not worth it. I will likely never eat one of those cookies again. I’d rather bake my own – far more tasty and far less calories!

20359957_BG1

Sometimes the treat is worth the price. In another example, I love chocolate covered almonds. Every now and then I would treat myself to a bag. A couple of weeks ago I was in the grocery store craving them so I decided to buy a bag – I’d been good and reached a new low that week. I ended up eating the whole bag, and yes it was quite delicious and satisfying. But it was also over 1000 calories, which is about 2/3 of my daily goal. Over the next couple of days my weight went up a bit and then back down – it took me about a week to recover from that indulgence. I don’t regret eating them, but I know that it will be a rare occasion when I will indulge in such a treat again.

My original goal was to lose 15 lbs. I am past the halfway mark now and am fitting into clothes I couldn’t comfortably wear before (I also had a pair of shorts almost fall right down in the grocery store; I now need a belt with them). I could have lost more weight by now if I had never “overindulged” at all, but because I don’t have much to lose, relatively speaking, it’s not slowing things down too badly, and it’s a price I’m willing to pay for the right occasion (Dim Sum!). Mostly I feel like I have control over my eating and my weight, and it is very much like the control one feels when one is budgeting their money. You can indulge in the occasional treat knowing you have accounted for it and the lack of guilt makes it that much more enjoyable!

My weight over the last 30 days.

My weight over the last 30 days.

Not Back to School week

Not Back to School-001_thumb[1]

It is Day 1 of the new learning year. While families and children spent the morning trying to get back into their morning routines, filling backpack, packing lunches, rushing off to catch school buses, etc. my family slept in, listening to the quiet sounds of the rain pattering on the roof. After a morning run with my husband, I did some laundry and began the first lesson of the year: unloading the dishwasher!

This year I’m planning on doing more homeschool stuff with the kids, which means I’m going to need help with the housework. As part of my own morning routine (which I’ve been slowly easing into over the past week) I do a load of laundry, empty the dishwasher, and fill it up with any dirty dishes that didn’t make it in last night. This morning I had the kids unload the dishwasher, and I stood by making sure they knew where everything went. They actually seemed to enjoy it, playing together as they worked. Mr. Boo enjoyed pulling the chair over to the counter so he could put things on higher shelves.

To celebrate the first day of Not Back to School I made them their favorite breakfast: English pancakes. These are basically crepes rolled up with lemon juice and sugar. These were my favorite treat as a child, and I’m happy to have passed on the tradition.

After breakfast the kids had some time to play while I finished tidying up, and then it was Math time. Mr. Boo has not done any math for over a month as I decided to give him (and myself) a break towards the end of summer. I was pleasantly surprised to see he had forgotten nothing of the exercises he’d last been working on. He even advanced through the lesson and picked up a couple of new concepts. He really has an amazing head for numbers – the challenge is getting him to sit still and focus. He made it to 15 minutes before he started getting really squirrelly, and finished up at just shy of 20 minutes in total. An excellent first day back!

While Mr. Boo uses a program called Dreambox Learning, Miss Em has decided it’s too “babyish” and so we are giving Khan Academy a try. Today she took the Placement Test and began some lessons. She enjoyed the ones about graphs, reinforcing my belief that she is a visual learner. She also learned how to carry numbers today for adding 2- or 3- digit numbers together. It was a chance to view the instructional videos that come with Khan Academy, but also this was part of a lengthier video about adding in general so she got bored pretty quickly. In the end, I grabbed a sheet of paper, showed her how to carry, and she immediately got it and was off. She ended up adding the numbers and doing the carrying in her head, simply typing down each digit of the answer as she progressed. She hasn’t decided whether she prefers this to Dreambox, so we’ll continue for another week or so until her old Dreambox account is about to expire and she can make her decision then.

I have been preparing the kids for this week and the work definitely payed off. I had no meltdowns or tantrums today and the kids followed the plans to the letter. We’re done for the day now, which is fair since the school kids are only having half days as well today. Plus I want to ease them into their full weekly schedule slowly. Most activities don’t start until next week, and some even later, so it’s the perfect slow transition into busier days. I’m feeling really good about this learning year and looking forward to sharing our progress with our Learning Consultant.